Train Simulator Controller: Dashboard Prototyping, Part 1

For two and a half years, I have been working on a real train dashboard modeled on the UK Class 800, known currently as the LNER Azuma and the GWR Intercity Express Train (IET), for use with Train Simulator. As I continue towards a first complete version of this dashboard, my focus has shifted from designing electrical components to the construction details of its panels and structures. Since early 2025, that process continued with fine-tuning the math used to derive the overall shape and size of the prototypical dashboard. I then developed a cardboard prototype, iterated on a CAD model to be used to get steel and wood components fabricated, and cataloged what buttons I still need.
Thus far in my journey, I have shared my design process up to the end of January 2025, including referencing existing 3D models to guess the slopes and sizes of the various panels of the dashboard and creating 1:5 and 1:10 scale models. Since January, I have continued the prototyping process with:
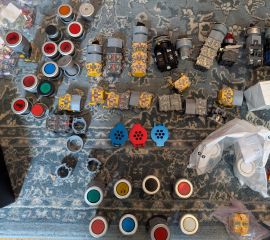
- Cataloging the buttons and indicators I have available, and discovering that I have quite a few more to find and order. Examples of components I still need to find include latching (maintained) button actuators, bayonet-style LED bulb holders, emergency stop buttons, and smaller buttons for a mock TPWS panel.
- Diagramming the panels within the dashboard, including accounting for the depth of the material to be used for the panels.
- Using these diagrams to construct cardboard prototypes of each panel, then gluing them together to get a sense of the size of the result - and whether it will even fit on my desk.
- Using the diagrams and 1:1 cardboard model to refine the design into steel and wooden components that can be fabricated - and soon, to resist the friendly nibbles of two cats that love chewing on cardboard.
- Focusing in particular on the placement of buttons, such as within a mock TPWS panel, and the array of indicators flanking the speedometer panel.
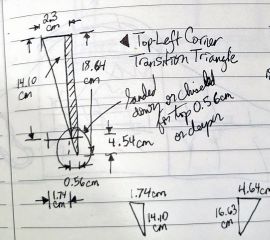
I started with nailing down the precise dimensions of each of the panels in the dashboard, using the geometry calculations from the Python script discussed in my January 2025 blog post and accounting for the thickness of the neighboring panels and supports. At this stage, I was envisioning laser-cut 1/4" plywood (actually 0.56cm thick), the thickest (and thus strongest) readily available plywood that would be thin enough for the various buttons I am using to be correctly mounted. I covered pages of notebooks with dimensioned diagrams such as this:
As I nailed down an initial set of dimensions for each panel, I then began to create 1:1 cardboard versions of each, including sandwiching together two pieces of corrugated cardboard with grains at right angles for maximum strength and the correct thickness. Over six months, I added pieces to this collection, plus three of the four supports necessary to let the cardboard prototype be freestanding. Along the way, I also updating the air pressure gauge and added a control for the train’s horn. And a few weeks ago, I began cataloging exactly how many indicators and buttons I have, and how many I still need to acquire. With this inventory in hand, I resumed my US and UK eBay research for the missing lenses, actuators, bulbs, and whole button assemblies that would be needed to complete the dashboard. Many of my existing button components come from disassembling two Class 313 dashboards - hence, for example, the smiley face-adorned actuator in my collection.
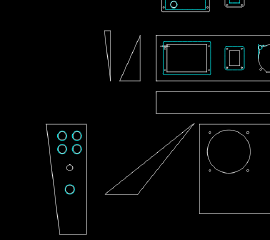
I also began translating my hand-drawn diagrams and unassembled cardboard components into CAD drawings that could be sent to a fabricating company to create hardboard and/or steel versions of these panels. Along the way, I refined the dimensions, the button layouts, and the cutouts for various one-off components like my air gauge and AWS sunflower. I also switched from directly cutting out every button cutout from large panels to using smaller panels for some sections, such as the TPWS interface and the DRA button, matching the prototypical Class 80x’s excellent example.
Shortly before The Greatest Gathering at the beginning of August 2025 in the UK, I was motivated by knowing that I would see several simulators to finally start putting these cardboard components together. I hoped a more completed prototype would allow me to judge the size and shape of the result. A few days of sporadic gluing later (not least of the cardboard supports behind the dashboard), I placed the dashboard prototype on my desk. My immediate discovery was that it was about two centimeters too tall to fit under my 55" Samsung Odyssey Ark monitor, even with its stand raised as high as possible. Helpfully, while I was placing the buttons on the left-center panel, I discovered that it also seemed taller than the real thing: no matter where I placed the Snow Brake button, it was either too close to the Emergency Stop button above it or to the bottom of the panel. Therefore, I intend to shorten the bottom section of the center panel, solving both the button placement and fitting the dashboard under the monitor. And if I can get a better sense of the size of these panels from the Class 80x at The Greatest Gathering, all the better for the realism of my simulator. Next, I’ll be completing my cardboard prototype and rapidly moving on to a steel-and-wood version, including added a wooden framework behind the panels to save needing the edge-to-edge mounting of the panels to provide all of its strength.


