
"AI" on a Calculator: Part 1
Over March 25-27, 2023, I took the Amtrak California Zephyr from San Francisco all the way to Chicago, a 56-hour journey during which I challenged myself to port a neural network to a graphing calculator. After having seen the idea floated around for quite a few years, I wanted to prove that it was possible to run a nontrivial, useful machine learning algorithm on a calculator - because after all, what would be better to perform lots of math than a calculator? Calculator hobbyists would be the first to tell you that the answer is “just about anything would be better”.
TI graphing calculators, namely the TI-84 Plus CE, have a long legacy of making use of what could charitably be called modest hardware. Until 2013, the TI-83 Plus/TI-84 Plus family used the Zilog z80 CPU first introduced in 1976, operating at a blazing 6 to 15 MHz and paired with about 24KB of user-accessible RAM and up to 1.5MB of longer-term Flash storage. The TI-84 Plus CE upgraded the calculator family to a speedier ez80 CPU, 154KB of user-accessible RAM, 3.0MB of Flash storage, and a 320x240-pixel color LCD. It’s for this newest model, the TI-84 Plus CE, that I targeted this project; any earlier calculator wouldn’t have had enough RAM to store the state of even a moderately simple neural network like the one I used.
Over the three days of my train trip, I succeeded in porting a CNN to the TI-84 Plus CE, converting the well-known MNIST dataset of 60,000 handwritten digits to a calculator-friendly format, performing both training and inference on a calculator and a computer, and ultimately demonstrating a successfully running neural network accurately identifying handwritten digits on the calculator.
Table of Contents
The Premise
For a few years, I have wanted to try running a neural network of some sort on a graphing calculator, to show it was possible. Past calculator projects of mine sound equally ambitious: connecting calculators to the internet, adding a mouse and keyboard to a calculator, connecting a GPS module to a calculator, building a Windows-like shell (“OS”) for a calculator, and so on. Each of these projects shared the attributes that though ambitious, I knew that they were technically feasible to do in at least some form before I started, and that what I would discover during the project would be how far I could bring it or polish it. For example, I knew that I could bitbang serial from a calculator to talk to a GPS module that spoke NMEA 0183 over serial over USB, but not how lossy the communication would be (i.e., if it would drop some GPS position packets), and I certainly expected that I wouldn’t be able to put any nontrivial maps on a calculator to use with the GPS.
In this case, I knew that a calculator could run some neural network: the question would be how powerful of a neural network it could run. Although this project was not easy, and required solving a surprising (even to me) number of interesting embedded systems programming challenges, the machine learning it employs is quite straightforward. Most beginner-difficulty machine learning projects take several shortcuts to make them faster and easier to complete, and this project was no different:
- Using an existing dataset: I first used the MNIST dataset of handwritten digit samples in 2009, while writing my master’s thesis on CNNs for facial detection. The MNIST dataset was a great way to get started with testing out CNNs without needing to create a dataset from scratch, and as any machine learning scientist will tell you, one of the biggest blockers to good machine learning is not having enough training data. Using this
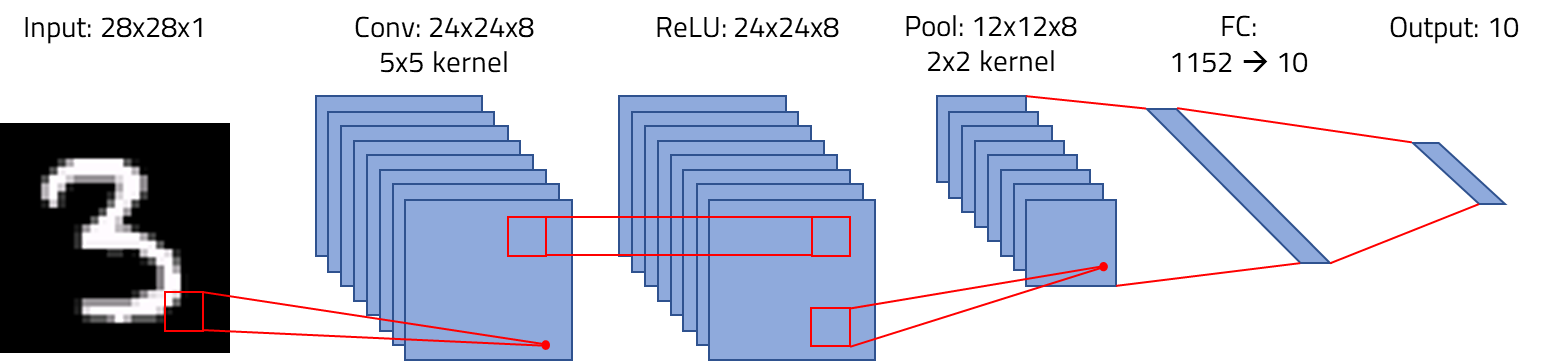
- Using an existing network architecture: I’ve put together one or two CNNs in my time, many of which have been based on the classic LeNet-5 by Yann LeCun in 1998. Back-of-the-envelope calculations indicated that the state of a LeNet-5 would be far too large to fit on a TI-84 Plus CE, so I selected a simpler CNN written by Can Bölük, to make the hard part optimizing the network to run on a calculator, notdesigning a network architecture.
- Using an existing machine learning framework: Unsurprisingly, there are no machine learning frameworks for graphing calculators. TensorFlow, PyTorch, Keras, Caffe, and many others are widely used by professionals, academics, and hobbyists alike, but none will fit on a calculator. Python is right out, and even the C and C++ options are far, far too large to fit on a calculator with 3MB of Flash and about 150KB of RAM. My solution was to use the simple C++ CNN I just mentioned, which in some sense is a rudimentary framework: its layers can be fit together in different ways.
- Using an “easy” programming language: I have written many z80 and even a few ez80 assembly programs: when wielded skillfully, you can create powerful programs with few registers in few bytes of code. With the C/C++ toolchain created by the calculator hobbyist community, however, higher-level programs are possible, and I was willing to sacrifice a bit of speed for a faster proof of concept that could be finished in days, not weeks.
Finally, although there is an excellent emulator for the TI-84 Plus CE that significantly simplifies debugging, I wanted to test the math on a computer, so I set out to write the code such that it could be compiled for either Ubuntu or the TI-84 Plus CE. Thanks to the toolchain, that wasn’t that difficult; the biggest challenges were working around the shortcomings of the hardware (and a few missing software features).
Building the Tool
The steps to build a CNN for a graphing calculator were roughly:
- Create a Python class to read the MNIST dataset files (
train-images.idx3-ubyteandtrain-labels.idx1-ubyte). - Create a Python class to write TI-84 Plus CE AppVar (application variable) files full of training/testing samples.
- Make the PC-side
simple_cnncode capable of reading training data as-needed from AppVars stored as files, rather than caching the entire training set in memory. - Make
simple_cnncompile for the TI-84 Plus CE, including replacing the use ofstd::vectorwithnew/delete-allocated fixed-size arrays. - Debug a segfault that ultimately was caused by the calculator running out of heap space, but its
mallocnot returningnullptrto signal this. - Writing a custom memory allocator using the calculator’s “free RAM” as a second heap.
- Switching to using 8bpp graphics and
GRAPHXtext output instead of OS text routines, to free up 75KB of graphics RAM for a third heap segment. - Building a C++ class to write AppVars to allow checkpointing network state.
- Adding functionality to load a checkpoint and run testing directly.
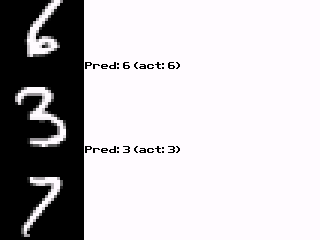
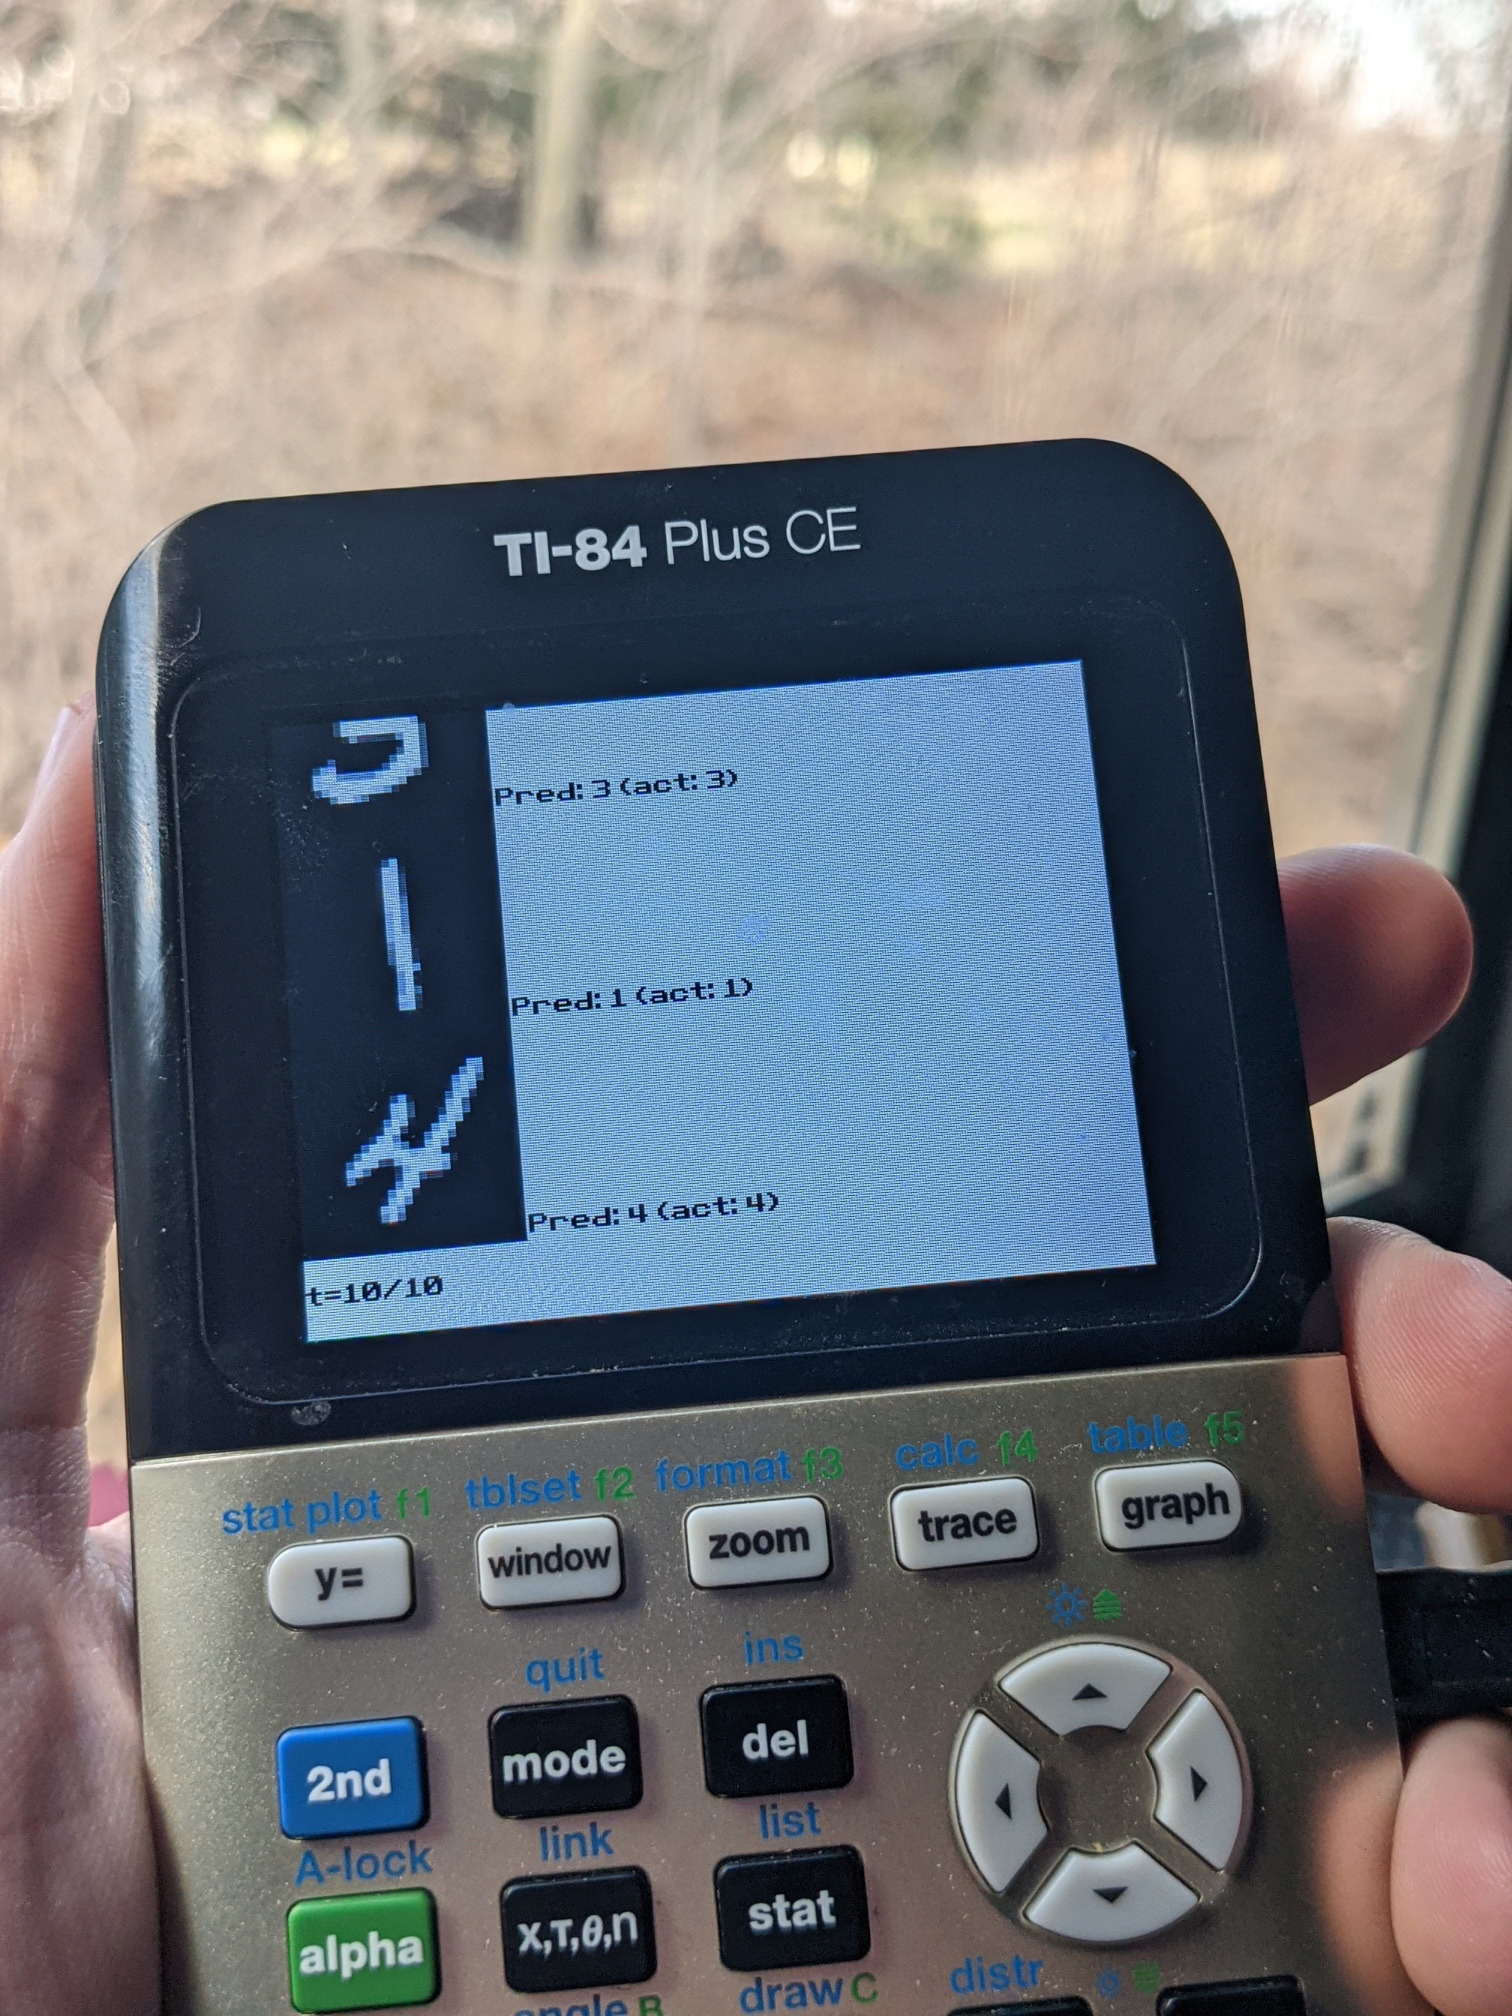
- Adding graphics routines to show testing images side-by-side with their actual and predicted label.
Day 1: I started by focusing on the PC-side tooling: a Python script to turn the tens of megabytes of MNIST dataset into smaller AppVars that could be used on the TI-84 Plus CE. (Relatively) large-scale data storage uses application variables, or AppVars, that can be up to 65,512 bytes each. Every MNIST training sample is a 28x28 grayscale (256-level) image, or 784 bytes, plus a 1-byte label. Therefore, 65512/785 = 83 (rounded down) uncompressed samples can be packed into each AppVar. The sample are randomly distributed, so I judged it would be sufficient to put a subset of the data on the calculator for training and testing: 42 of these AppVars consumes 2687KB of Flash, leaving enough space for the checkpoint (46KB), the CNNCE program itself, and the CE C/C++ libraries.
The simple_cnn program I ported loaded the entire dataset into RAM ahead of time, which makes sense on a PC with gigabytes of RAM but not on a calculator with tens to hundreds of KB of RAM. Therefore, I made it instead iteratively load one sample at a time from a rotating set of AppVars as-needed, storing only a single sample in RAM at any time. By the end of Day 1, I was able to successfully run the PC-side program, train the network, and achieve 94%-98% accuracy on a testing set (size of range: I held aside a small set of 83 test images).
Day 2: The focus on the second day was making the network run on the calculator; by the end of the day, I was able to train the network on the calculator, albeit painfully slowly. My work started with stripping std::vector out of the code, because the CE toolchain doesn’t include an STL implementation. Luckily, the vectors were largely extraneous, as the sizes of the sets of CNN filters and fully-connected gradients are known a priori. I replaced these with use of the new[]/delete[] constructs. I was also using a std::vector to store the list of available sample AppVars: I resolved this by collecting sample AppVars in two passes, one to count the number of available AppVars and then reserve a C array, and the second to populate it with the names of the AppVars.
The biggest hurdle I solved during the second day was fitting the state of the network on the calculator. In fact, I first had to discover that it definitely didn’t fit in the existing heap: my math confirmed that it would be far too large, but I could not positively identify exactly where it was failing, as malloc() (and new) would not correctly return nullptr when there was no available memory to reserve. I therefore started by writing a trivially simple allocator that would simply grab a sequential portion of the ~100KB “user RAM” and apportion it out to be used for tensors (leaving all other memory allocation in the default heap). This allowed the program to get further, but it would still crash while allocating the final 1152x10 fully-connected layer. Therefore, I needed more memory. The biggest remaining source of memory was video RAM (vram): normally, the TI-OS stores the contents of the screen in a 320x240x16-bit (150KB) buffer, but by placing the LCD in an 8 bit-per-pixel mode and avoiding double-buffering, you can use 75KB of that buffer as additional RAM. I improved my memory allocator to use that second area, keep track of allocated and free blocks, properly put freed blocks back in the free list, and try to fit allocates into the closest-size available block. I didn’t want to completely turn this into a memory allocation project, so I didn’t add bucketing, and I didn’t add defragmentation of free blocks. I did ensure that memory would rarely be repeatedly allocated and freed, and when memory was repeatedly allocated and freed, that the blocks would not change size (so the recently freed block could be reused). And this allocator is only used when compiled for the TI-84 Plus CE, not for PC.
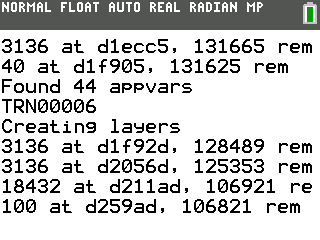
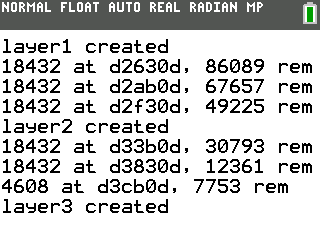
I had to write a few extra routines to help with drawing text to the 8bpp buffer (visible in the third image above), but by the end of the day, I was successfully training the network on the calculator. Each training sample took about 79 seconds to feed forward and then backpropagate: it was clear that I needed checkpointing, and I probably wanted to checkpoint a trained network on the PC and transfer it to the calculator.
Day 3: The third and final day was spent on making the resulting project more useful: checkpointing and visually testing the model on the calculator. The hardest part of adding checkpointing was creating a C++ class to store the checkpointed state back to an AppVar on PC, primarily because the simple_cnn project I modified and ported was built without the normal separation between class declarations in headers and definitions in implementation files. Adding visual outputs to inference on the calculator was also not difficult, merely the rote creation of routines to scale the images while writing pixels to vram. In testing, the network consistently classified 10/10 or occasionally 9/10 of the samples correctly, the errors usually being characters that a human would also misclassify (e.g., a 3 with part of the bottom curve off the bottom of the image, thus resembling a 2). Inference takes about 18 seconds of realtime; the animated screenshot below has been sped up to about 2x speed.
“AI” on a Calculator: The Results
In three days, I was able to port a C++ CNN classifier for handwritten digits to the TI-84 Plus CE graphing calculator, solving systems challenges to fit the program on a resource-constrained platform. Although the calculator can run both training and inference, at its current speed it would require 1316 hours (55 days) to train on all 60,000 images in the dataset, or even 76 hours for the 3,486 samples that could fit in the calculator’s Flash memory. Therefore, it was prudent to train the network on a computer (requiring less than 5 minutes), transfer the checkpointed network state, and run inference on the calculator: inference takes around 18 seconds. The trained network achieves better than 95% accuracy, and qualitatively, its predictions make sense. Future work includes allowing the user to sketch a digit directly on the calculator to demonstrate truly online classification.
The biggest source of slowdown is ez80 CPU’s lack of floating-point operations. IEEE754 floats are emulated in software, and training a neural network is composed primarily of addition, multiplication, and division operations. Per the Future Work section, this is a tractable problem: optimized software floats or fixed-point floats could accelerate this.
Future Work
Many academic papers include a aspirational and highly optimistic “future work” section discussing ways in which the project could but probably won’t continue to develop in the future. In that vein, should I find the time, the biggest improvements I’d like to make are to the speed. 79 seconds to train and 18 seconds for inference are far from ideal; possible optimization strategies include:
- Switching to better-optimized software floats.
- Using fixed-point numbers.
Accuracy of the system is a secondary concern. Improving accuracy would be most easily effected by making the network more complex. The network currently in use barely fits, so tricks would be necessary to store a larger network. The obvious strategy would be to perform quantization of weights and node values (e.g., to 16-bit or 24-bit floats) and expand these values to 32-bit floats only when mathematical operations need to be directly performed on the values.
Finally, as mentioned above, I would like to use the excellent USB libraries the community has created to attach a mouse to the calculator, allowing the user to directly sketch a digit for recognition.